Raw Cherry Cheesecake

CSC_0565I’m proud of this one.

But first, I apologize for my unannounced hiatus. I had the worst semester, if not year of school and going back to see my parents, sister, and friends has meant no time to sit and plan a blog post (let alone relax). I’ve been cooking an excessive amount for my parents but considering it’s “summer” (we are still having days of 11 degrees…) it’s always simple and full of fresh garden veggies and herbs.

Recently, my pa and I took a roadtrip into the mountains and we ended up stretching a bit and going into southern British Columbia. The purpose of pushing eight hours (and more) of driving into BC was the fact that THE CHERRIES WERE ALL PERFECTLY RIPE. Yes. We were in southern BC for cherry season. I was eating cherries that were still growing (straight from the tree and into my mouth). It was amazing. Unfortunately we don’t know precicely what species of cherries we got (probably some Bing Cherries, some Sweet Cherries, some Rainier, maybe some Lapins or Namare?), but we must have brought back 10 to 15 pounds of cherries. I mean, HOW COULD WE RESIST?

DSC_0563

Regardless, here is a raw vegan cherry cheesecake I made with some of those amazing fruits.

RAW CHERRY CHEESECAKE: (makes 1 9inch spring form pan)

-CRUST:

  • 1/2 cup almonds
  • 6 medjool dates, soaked for 20 minutes
  • 1 cup dessicated coconut, unsweetened
  • 1/4 cup cacao nibs
  • 1 tablespoon agave nectar
  • 1 tablespoon coconut oil, melted
  • pinch of salt
  • 1/3 cup cherried, pitted and chopped

Method:

In a food processor, pulse the almonds until a large crumb forms. Add the remaining ingredients and process until well combined. Press into the bottom of a 9inch spring form pan. Top with 1/3 cup chopped cherries and let set in freezer for 2 hours.

– CHERRY FILLING:

  • 3 cups young coconut flesh (I used 3 young coconuts)
  • 3 heaping cups cherries, pitted
  • 1/3 cup coconut water
  • 1/4 cup coconut oil, melted
  • 1/4 cup chia seeds
  • 3 tablespoons lemon juice
  • 2 tablespoons agave nectar
  • 2 teaspoons pure vanilla extract
  • 1 avocado
  • a pinch of salt

Method:

Add everything into the bowl of a food processor and blend until very smooth; scrape the sides down every few minutes. (It took about 6 minutes of blending to get it to my desired texture) Pour on top of the set crust and allow it to set in the freezer for a minimum of 4 hours.

Garnish with cherries, cacao nibs, almonds and coconut.

Allow the cake to thaw for about 5 – 10 minutes before serving!

Creamy Curry Soup

DSC_0702

So. While I like to think I’m an efficient human being who gets her stuff done (and done well), I admit that lately I’ve been slacking. Okay… not slacking but just… not doing anything. Showtime is upon me, which means the end of school (THANK ALL THE DEITIES!), and time feels non-existent. Everyday seems to slip by and I feel like I’ve achieved NOTHING. That being said, at least I JUST completed the second year of my program and SUMMER IS UPON US. So here is a warming soup…

This soup, creamy due to the roasted eggplant, is best served slightly warm, in my opinion. It’s earthy and spicy and crazy refreshing. Not to mention there are SO few ingredients it’s a snap to whip up. I had leftovers over a bowl of amaranth one day, and the next I dipped crackers into it – both were awesome.

CREAMY CURRY SOUP (serves 4)

  • 1 large eggplant, cut into 1/4 inch thick rounds
  • 2 tablespoons grapeseed oil
  • 1 large shallot
  • 1/2 tablespoon curry powder of choice
  • 2 cups water (or milk alternative)
  • Salt and pepper, to taste
  • 1/4 cup Fresh cilantro, to garnish
  • 1/2 cup cremini mushrooms, chopped, to garnish

Method:

Preheat the oven to 400F. Coat the eggplant rounds in the grapeseed oil and sprinkle with salt and pepper. Roast for about 8 minutes, until they are golden and quite mushy. Remove from the oven and let cool for five minutes. Remove the skin with a knife (it should peel off easily if it roasted long enough)

In a blender, blend the roasted eggplant, shallot, curry, water (or milk alternative) and salt and pepper. Divide the blended soup into four bowl, do a final test for salt and pepper levels, garnish with cilantro and mushrooms, and serve!

Balsamic Marinated Tempeh Steaks

DSC_0673


WOO! IT’S NOT A SALAD. It’s simple tempeh steaks that are marinated overnight and provide a big punch of flavour to the meal. I don’t have much else to say. It’s easy. If you don’t know what tempeh is, it’s soy based. However it’s not as processed as tofu. Here’s some info if you want to know more!

I recommend marinating the tempeh steaks in a large and flat container, but for lack of space, I used a narrow and tall container which worked well. The marinade filled up the majority of the container so the steaks were nicely saturated.

BALSAMIC MARINATED TEMPEH STEAKS (makes 16 small steaks – serves 4)

  • 1 350g package of plain Tempeh
  • 1/4 cup balsamic vinegar
  • 6 tablespoons olive oil
  • 3 tablespoons fresh lemon juice
  • 1 shallot, chopped
  • 1 teaspoon maple syrup
  • 1/4 teaspoon salt
  • 1/4 teaspoon pepper
  • 1/4 teaspoon dried thyme
  • 1/4 teaspoon dried oregano

Method:

Slice the tempeh into 16 equal sized slices.

In a medium sized bowl, whisk together all the remaining ingredients for the marinade. In a large, and flat tupperware containter or a cookie sheet, pour in about 1/3 of the marinade. Place the tempeh steaks in the marinade, trying to make as few layers as possible. Slowly pour over the remaining 2/3 of marinade to soak all the tempeh.

Cover and place in fridge for at least one hour, or better yet, overnight. Remove from fridge before serving – best served at room temperature.

Beet Salad with Simple Miso Dressing

DSC_0668 Please don’t hate me because my last three posts have been salads. I’ve to realize that when I come home after class, extravagance is not a thing. Efficiency and simplicity is what I’m all about these days. Another things I’ve noticed about myself is that my diet is hugely raw. Yes, I eat cooked grains and sometimes make roasted yam fries, but otherwise, my cooking is kept to a minimal (mostly because of the time). This salad is a prime example: shredded raw beets! Of course, you could shred them and roast them for a while (with a bit of oil and salt and pepper)to tenderize them, but here, I love the earthy AND crispy texture they give. Add a simple miso dressing and BAM, I got a salad for the ages. With this I had a fieldroast sausage, and a plain piece of toast (I’m not lying when I say I’m really into simplicity these days – I crave plain slices of toast). I simply ADORE Silver Hill’s Squirrely bread. Silver Hills Bakery makes awesome bread; they are vegan and packed full of goodness (and freakishly delicious).

I really love the white miso paste (which is the mildest) mixed with the balsamic vinegar; it’s a great combo of earthy and acidity. If you don’t know what miso is… I really couldn’t give you a good education on it… Basically there are A TON of different types of miso. It’s fermented. Yeah… Here’s a link to some info on miso!

By now, I’m positive you know the basics of how I make my salads, but here is the recipe regardless.

BEET SALAD WITH SIMPLE MISO DRESSING (serves two big bellies)

  • 2 cups raw beets, shredded (I used three medium sized beets)
  • 2 cups greens, chopped (I used kale)
  • 1/2 cup fresh parsley, chopped
  • 1 cup cremini mushrooms, chopped
  • 1 green onion, thinly sliced
  • 2 tablespoons white miso paste
  • 1 tablespoon balsamic vinegar
  • 1 tablespoon olive oil
  • salt and pepper, to taste
  • nuts or seed of choice for garnish (sesame seeds, hemp seeds, sunflower seeds, pumpkin seeds, etc)

Method:

Shred the beets on a mandoline or box grater and place into a large bowl. Add the greens, parsley, mushrooms, and onion to the bowl and mix.

In a small bowl combine the miso paste, balsamic vinegar, olive oil and salt and pepper and whisk to combine. If it’s really thick, add more olive oil or a bit of water. Pour the dressing over the salad and mix to coat.

Divide into two bowls and enjoy!

Amaranth Dill Salad

DSC_0632


I am a lazy lout. All I eat are giant one bowl meals/everything salads. That’s what the end of the semester does to me! As of today, it is exactly four weeks until go back to my parent’s to spend my 1.5 month summer vacation… sigh. It’s been a stupid year and I’m excited for my final performances in three weeks, BUT, I made a cool salad.

From what I can tell, amaranth is a fairly uncommon grain to cook with. It’s quite high in protein as well as iron. I adore the super earthy taste, and how it gets kind of gel-like when it’s cooked (A similar consistency to cream of wheat). The earthy flavour of the amaranth was awesome with the fennel and dill. And of course I loaded it with kale, cilantro, green onions, and lemon juice. I also topped it with a handful of pumpkin seeds and a hemp seeds. It rocked. It was also amazing because it held up for nearly 6 hours out of the fridge! Therefore, I recommend making a big batch and saving some for left overs/the next day. OR it’d be a perfect dish to take on a picnic… because it’s apparently spring…

AMARANTH DILL SALAD: (serves two)

  • 2/3 cup dried amaranth
  • 1 2/3 cup water
  • 1 medium fennel bulb, shredded
  • 3 cups kale, or greenery of choice
  • 1/4 cup fresh dill
  • 1/4 cup fresh cilantro
  • 2 green onions, thinly sliced
  • 1/4 cup lemon juice
  • 2 tablespoons olive oil
  • salt and pepper to taste

Method:

In a medium saucepan, with the lid on, bring the amaranth and the water to a boil. Reduce the heat to medium and let simmer for 20-25 minutes. Check it every 5-ish minutes after 15 minutes of cooking to ensure it doesn’t burn, and add more water (by the tablespoon), if necessary. Remove from heat, and let steam with the lid on for 10 minutes. Let cool.

In a large bowl, combine the shredded fennel, chopped greens, herbs, and green onion. Add the amaranth. Pour over the lemon juice and olive oil and mix well. Add a final shake of salt and pepper (salt is especially good here), and serve warm or cold!

Mushroom Lentil Salad

DSC_0413 Classic me. Lentil salad… SIGH. Whatever, it was still freaking amazing. To keep it short, this salad has greens, fresh cilantro, french lentils, sauteed mushrooms and onions and garlic, green onion, and dried basil. Bam. Simple, and filling and so hearty in flavour. For two meals worth, I fried up two large portabello mushrooms and it was the perfect amount. ALSO, I overheard from a chef that you’re not supposed to sautee mushrooms with salt because it makes them watery (you add the salt at the end). I tried this method and HOLY, it really brought out the flavour of the mushrooms and they didn’t get all watery when I cooked them! It was awesome.

I LOVE MUSHROOMS. They are a vegan’s steak. Am I right? My parents recently sent me a picture of their portabello mushroom burgers. Which were fried mushroom caps in a lettuce “bun” (with various fixings). Mushrooms are not only healthy as… really healthy things… they’re also tasty, versatile, and come in a huge variety. White button and crimini (look like brown button) are by far the most common and accessible. There’s also shiitake, porcini and oyster are also fairly common. Then there are the more “exotic” types such as king, enoki, chanterelle, and morel. Here’s a link to a super basic overview of some of mushroom’s health benefits, and here’s one more for safe measure (this second one is a bit more in depth).

Of course there is a plethora of information out there in books and web pages and humans about the amazing powers of mushrooms (even the magic ones!), but I want to give you my take. Mushrooms are great raw and cooked (sauteed, fried, roasted, grilled… anything). They’re also super simple to fix up, just cut, oil and cook. If I have time, I love to roast them with a bit of balsalmic vinegar. Ahhhhhhh. Yis. AND their meaty, chewy texture is sure to never make me crave meat (except ribs. I’ll admit that sometimes I miss big saucy ribs… maybe slathering a ton of mushrooms with rib sauce…). I’ve always wanted to try making these chickpea crepes stuffed with smoky and herbed mushrooms. Or these mushroom-sunflower seed “meatballs”. MUSHROOM LENTIL SALAD (serves two):

  • 1 cup cooked french lentils (cooked from about 2/3 cup dried)
  • 1 tablespoon grapeseed oil
  • 1/4 cup chopped shallot (or white onion)
  • 2 medium garlic cloves, minced
  • 2 large portabello caps, roughly chopped
  • 3 cups greens (I used a Spring Green Mix, but spinach or kale would rock)
  • 1 cup fresh cilantro, roughly ripped
  • 1 green onion/scallion, thinly sliced
  • 1/4 teaspoon dried basil
  • salt and peper to taste

Method:

Cook the lentils and set aside to cool. Here is a link to how to cook lentils if you don’t know how (just follow the 1 cup lentil to 2 cups water rule and cook for about 20 mins).

In a thick bottomed fry-pan, heat the oil on medium heat. Add the shallots and garlic and cook for 3 minutes until the shallots are translucent. Add the chopped portabello caps and cook for an additional 8 minutes until they’ve browned and softened. Remove the mushrooms from the heat and allow to cool for five to ten minutes.

In a large bowl, combine the greens, cilantro, scallions, cooked lentils, mushrooms and mix. Add the dried basil and salt and pepper to taste.

Divide the salad between two plates/bowls and serve while the mushrooms are still slightly warm. Add any extra salt or pepper as needed.

There you go! Simple and rich. Much light and love.

Raw Caramel

DSC_0708 I feel like raw caramel is a bit of a trendy thing to do these days (I’ve seen about ten million recipes for it… I feel like even Lauren Conrad has one…). BUT I DON’T CARE BECAUSE IT TASTES LIKE SUMMER AND ALL THINGS GOOD. I love caramel. Specifically I love caramel apples. When my sister lived in Vancouver I would always demand to buy a caramel apple from Granville Island… I even forced her to fly one home on a few occasions… All that to say caramel has a special place in my heart.

The best part about this caramel is that there’s no boiling of cups and cups of white sugar! Or maybe the best part is that it tastes awesome… regardless, it’s super easy and made for a wonderful afternoon snack with some cut up apple. The main reason this is considered “raw” is because I used raw almond butter. Of course you can use any nut butter you want, and it can be roasted or salted if that’s what you have (I imagine this to be good with cashew butter).

As you can see in the picture, I had this caramel with apple slices (an organic Pink Lady apple, if you were curious). I imagine it’d be awesome with any other fruit, with chocolate, on toast with jam, in oatmeal or chia pudding in the morning. As I mentioned, it’s refined sugar free… therefore it’s the best kind of snack for any moment in the day.

RAW CARAMEL: (Makes 1/2 cup)

  • 1/3 cups dates, pitted and soaked for 4 hours in water (reserve the soaking water*)
  • 2 heaping tablespoons raw nut butter of choice** (I used almond)
  • 1 tablespoon lemon juice
  • 1 teaspoon vanilla extract
  • pinch of salt

Method:

In food processor, or a high speed blender (I used my handy little magic bullet), blend the soaked and pitted dates, nut butter, lemon juice, vanilla, salt, and 2 tablespoons of the dates’ soaking water. If it’s too thick, add more of the soaking water.

Notes:*Instead of using the soaking water from the dates, you could alternatively use almond milk. **I’ve seen many recipes that use nut butter AND coconut oil. I imagine that’d be awesome and make it SUPER creamy… as always: feel free to play around!


Much love and peace in these stressful days of end-of-semester-madness.

New York City

Life is hard. So I went to New York City. I needed to get out of Montreal, and it proved to have been the right thing to do. In school, so much of my learning is based on my internal world; my inner sensations and my thoughts and my body are under constant construction because of what my classes demand of me.  I get wrapped up in existential thoughts (why does dance even matter!?) and I get wrapped up  in the dangerous web of self criticism and I get wrapped up in the way my body feels. Ultimately, school causes me to hugely disconnect with the external stimuli I know and love. So, going to NYC was the best choice for me. The insane amount of external stimulation pumped me back to life. I learned SO many things; I’m starting to feel like an adult… I’m starting to understand why my parents and sister are poor of money, but rich of the world; next time I have any money you’ll be sure to see me on a plane, train or automobile. BUT, less about my lame food for thought and more food for our bellies. I ate at some seriously awesome places. My top 5 are: Peacefood Cafe, Jerusalem Restaurant, Two Boots, Beyond Sushi, and Lula’s Sweet Apothecary. Also, an honorable mention to Stumptown Coffee for the best damned almond milk latte. I also ate at Whole Foods. My first night, I was starving because I got distracted by the tall buildings and bright lights (I  felt like a serious country mouse), so I went to Whole Foods and created the HUGEST salad at their salad bar and it cost $12… I was shocked. At Commensal here in Montreal, a buffet style vegetarian restaurant, the same amount would have cost me upwards of $20. Any who, here are some photos of what I ate at those four beautiful places. DSC_0951
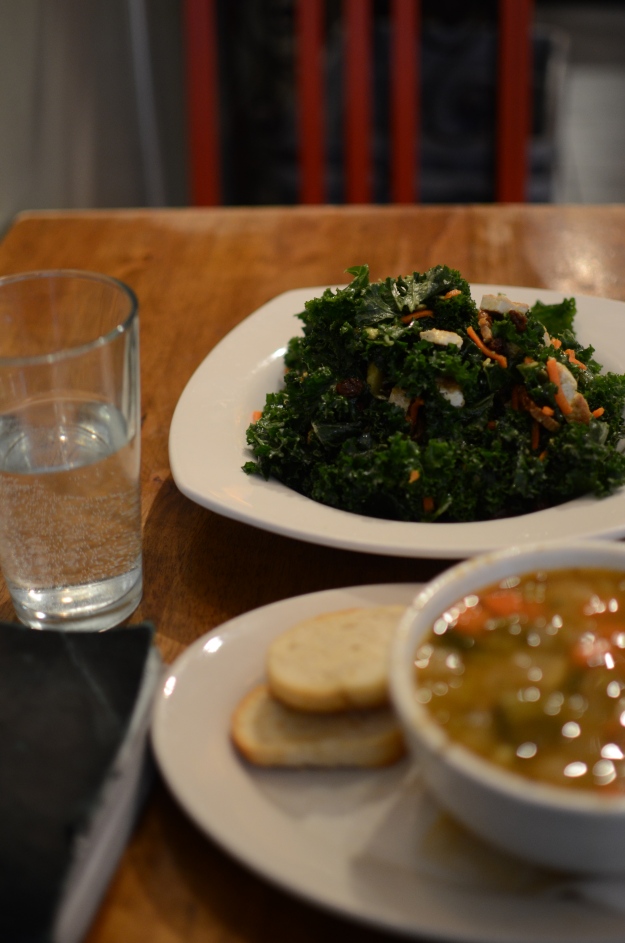
Peacefood Cafe. A bit pricey, but great home-style meals. I don’t mean home-style in the sense that it’s SUPER casual in the restaurant, I mean it in the sense that the flavours and ingredients are top notch and very comforting. There were some of the classic vegan fare-type things (kale salads, pasta with pesto, pizza, etc), which I was really into. For a soup+salad, an entree and a slice of key lime pie for dessert, it cost me $30 (including tip). As I said… PRICEY. But it was very tasty.

DSC_0231

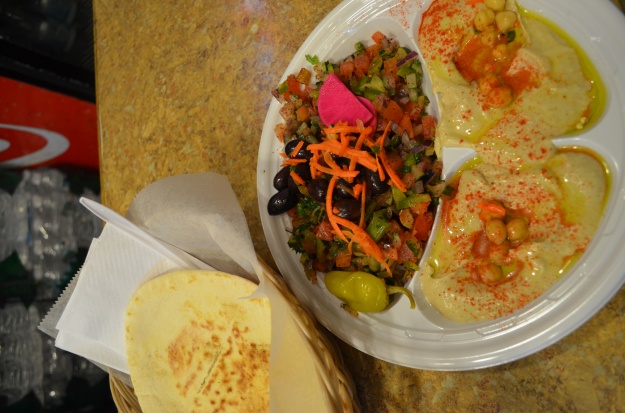
Jerusalem Restaurant. WOW. This was the greatest little whole in the wall. There is an outside window you can order at for take out, or there are 6 places inside. For $8 I got everything in the picture (a pita, Israeli salad and a HUGE amount of hummus). I loved this place because not only was the food fantastic (the hummus was seriously garlic-y), but the ambiance was great too; laid back, some groovy music, and two funny dudes running it made my dinner relaxing and pleasant. I was in at around 8pm and it was fairly busy – I couldn’t imagine what a zoo it’d become at lunch time!!

DSC_0370

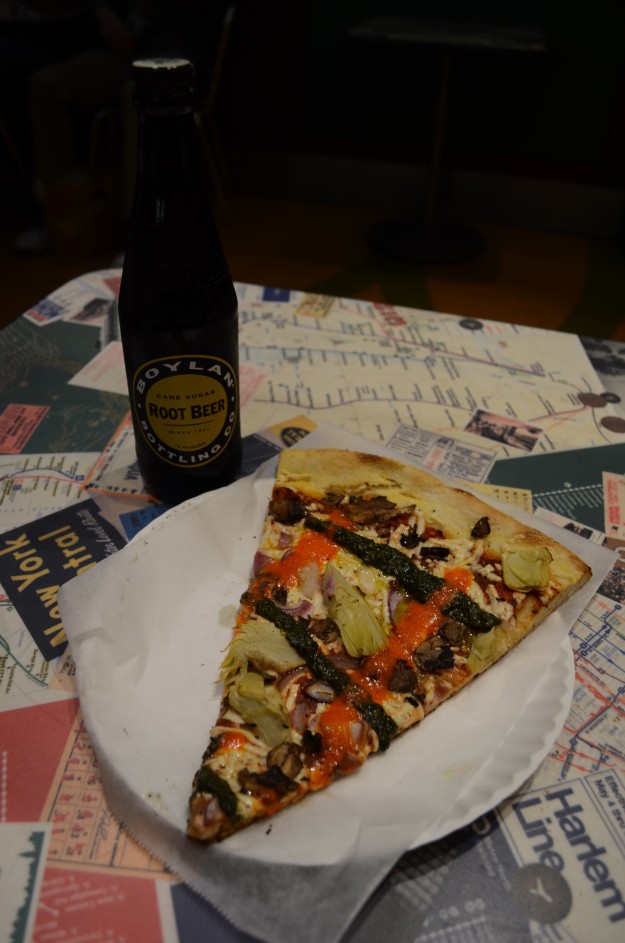
Two Boots. Okay, so I went to Grand Central station and the foodcourt was… heaven. There were more than 4 different vendors that had explicitly vegan meals! IT WAS SO COOL. I chose the V for Vegan pizza. The slice was $5. And OH MY GOD IT WAS UNREAL. The pesto and the roasted veggies and the Diaya cheese… it was something that totally hit the spot. Damn. I want a slice now. DSC_0188

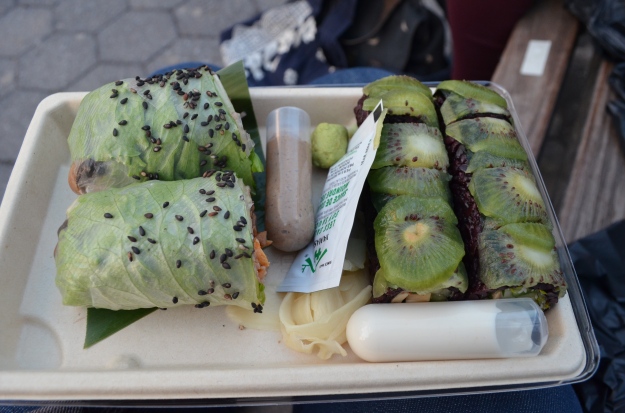
Beyond Sushi. This place was super fascinating. While the sushi had the traditional sushi taste, it’s all made with wild black rice and other cool ingredients. Again, all the choices were vegan. There are rolls (8 pieces), single pieces, and wraps. For $11 they have a combo where you can choose 1 roll and 1 wrap (there are many options for both). They also came with tasty sauces. Wow. Tasty is basically the only adjective I can think of when I think of New York… Anywho, this sushi was super cool, and filling. I was very pleased.

DSC_0237
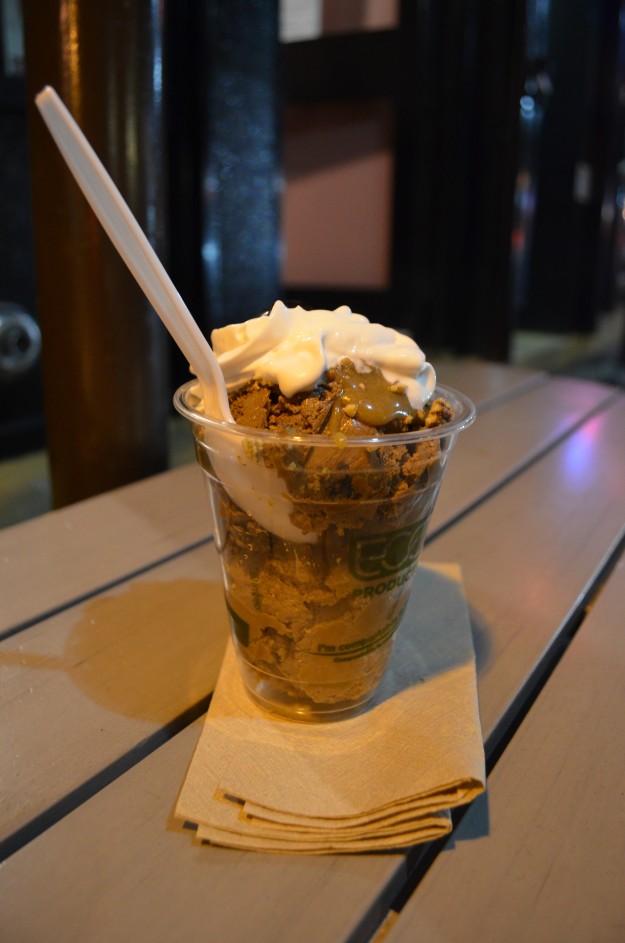
Lula’s Sweet Apothecary. (Forgive the weird photo – it was like 10 pm and I was SO antsy to eat it) Okay. I’ve left the best for last. This… this heaven on earth actually brought tears to my eyes. The tears didn’t come out of having deprived myself of ice cream for so long (trust me, I love me my Coconut Bliss), but they came from the pure ecstasy brought by the amazing flavour. So all the ice creams and all the toppings are vegan. I got a sundae for $7 (I know, a splurge. BUT it’s a great independent little shop AND it was so good I almost bought a second one…). A sundae includes two scoops of ice cream, one wet topping, one dry topping, coconut whipped cream, and a cherry on top. I chose mocha ice cream, chocolate chocolate chip ice cream, caramel, and candied pecans. It was like a turtle. They also had 1 flavour of soft serve (birthday cake) which you could get with a dry topping and they blend it up (like a Blizzard!) and there was also a brownie sundae and a banana split. Man. It was so great.

New York was SO great. I hope to return soon because I feel like I didn’t see enough/anything. AND there were so many good eateries that I didn’t have a chance to eat at.


Carrot Cake Smoothie

DSC_0771

As I’m sure you’ve come to understand, I’m a busy human being. School consumes my life, but when I get the time, I try to commit to my various passion-projects (they keep me sane). So, with the busy schedule, I like to pack all the things into my smoothies. Okay, okay, this smoothie doesn’t have spirulina or maca or bee pollen or goji berries or acai (OR WHATEVER SUPER FOOD), it’s still full of tasty goodness… seriously… like a cake in a cup!

If you’re skeptical about adding the rolled oats, don’t worry! They do not change the flavour, nor do they change the texture in your mouth. Primarily they thicken the smoothie (and because they’re a complex carb they bring great long lasting energy).

If you’re a fan of carrot cake with a bit of a tropical twist, add some pineapple chunks or mango. Even dried pineapple! Th next smoothie I want to experiment with is a blueberry pie one, or a key lime one.

Also, I recently went to New York City. I plan on posting about the amazing places I ate in the upcoming days!

CARROT CAKE SMOOTHIE: (serves 1 large glass, or 2 smaller)

  • 4 small carrots, washed (if your blender isn’t super good, roughly chop the carrots for easier blending)
  • 1 1/2 cups liquid (water, coconut water, nut milk, coconut milk, anything works)
  • 1/4 cup rolled oats
  • 1 large banana
  • 1 heaping tablespoon nut butter (cashew or almond rock)
  • 4 dates (alter amount based on how sweet you want it)
  • 1/2 teaspoon cinnamon
  • pinch of nutmeg
  • 2 teaspoons lemon juice
  • pinch of salt

Method:

Blend everything in a high speed blender until smooth. Enjoy!

Simple Oatmeal Raisin Cookie Balls

DSC_0684WHERE DOES TIME GO? I don’t know. But I think it’s better that I don’t…

School really pushed its limits (and my limits) this past month. I’m now on spring break so I’m beyond thankful for that. So to kick it off I made some cute little cookie things. They are the perfect size to just… shove in my mouth while I’m adventuring. They are adapted from Minimalist Baker’s 5 ingredient cookies, but I wasn’t in the mood for chocolate (I know… that’s not something you hear often out of my mouth), so I opted for raisins. Big surprise. One could easily add in any kind of mix in: berries, nuts, seeds, chocolate chunks, other dried fruit… anything really.

They are chewy and naturally sweet! The cool thing is that they;re actually really healthy (no refined sugars and only oats and almond meal!) so they could serve as a pre-workout power boost or as breakfast.

Oh, just a side note: I don’t have a food processor, just a handy lil’ magic bullet. This being said, I didn’t process the oats as the Minimalist Baker recipe recommends, therefore the oats were whole in my cookie. I really liked having the whole oats, but it’s a matter of preference (and what tools you have available!). ALSO, if you don’t want then to be balls, just squish them on the cookie sheet before baking to make them more like cookies.

SIMPLE OATMEAL RAISIN COOKIE BALLS: (yields 20)

  • 1 cup medjool dates, pitted and soaked for at least 2 hours
  • 1 medium ripe banana
  • 2 tablespoons nut butter of choice
  • 3/4 cup almond meal (ground almonds)
  • 3/4 cup rolled oats
  • 1/4 teaspoon salt
  • 1/3 cup raisins (or mix-in of choice)

Method:

Process the dates, banana, and nut butter until smooth.

In a large bowl, combine the oats, almond meal, and salt. Add the date puree to the oats and almond meal and mix until combined. If the mixture is too sticky, add more almond meal or oats one tablespoon at a time.

Add your mix-in of choice and stir until it’s well distributed in the mixture. Cover the bowl and let chill in the fridge for 10 minutes. Meanwhile, preheat the oven to 350F and grease two cookie sheets (I used coconut oil, but one could also use Earth Balance or grapeseed oil).

Once chilled, spoon out 1 tablespoon balls on to the cookie sheets with about 1 inch in between each ball. Bake for 15-18 minutes until lightly golden and slightly firm (Because there’s no eggs in these babies, they can be as under cooked as you want).

Let cool for a few minutes before transferring to an airtight container for storage… if any are left over after the feast.

EASY-PEASY! Much love as the days quickly transition from winter to spring (even though we got 30cm of snow overnight which covered the freshly uncovered brown grass…).